Printing barcodes
The most common cause of “my barcode does not scan” is not encoding – the bars are too small. Scanners need the narrowest bar (1D) or one module (2D) – the X-dimension – to be wide enough for their optics to resolve. As features shrink below that threshold, read rates drop like a stone.
Most symbology specs leave X-dimension to the application. The figures below are practical recommendations for the typical pyStrich print chain: a consumer-grade laser printer (300-600 DPI) plus either a low-cost handheld scanner or a modern mobile phone camera. Push the X-dimension up if either end of that chain is weaker – worn ribbons, blurry cameras, scans from a distance – or if the printed surface is reflective or contoured.
Symbology |
X-dimension |
Notes |
|---|---|---|
Code 39 |
0.19 - 0.50 mm |
0.25 mm is a safe default for industrial labelling. |
Code 128 |
0.19 - 0.50 mm |
0.25 mm reads reliably with most fixed and handheld scanners. |
EAN-13 (retail) |
0.26 - 0.66 mm |
GS1 specifies a nominal X of 0.33 mm (100% magnification); retail scanning typically allows 80%-200% of nominal. |
Data Matrix |
0.25 - 0.50 mm |
~0.3 mm is the common practical floor for handheld imagers. |
QR Code |
0.25 - 0.50 mm |
Mobile phone cameras typically need >=0.4 mm at arm’s length. |
PDF417 |
0.25 - 0.50 mm |
Row height must be >=3x the X-dimension (pyStrich default). |
Aztec Code |
0.38 - 0.76 mm |
Most reliable range; smaller works with good imagers, but mobile-camera reads degrade quickly below ~0.4 mm. |
For print-quality verification, see ISO/IEC 15415 (2D) or ISO/IEC 15416 (1D); for retail and supply-chain applications, follow the GS1 General Specifications.
Tip
Reach for SVG or EPS where your toolchain supports them. Vector output scales losslessly, so you size the symbol at layout time rather than locking in a physical size at encode time.
Vector output (SVG / EPS)
For SVG and EPS, pyStrich doesn’t determine the print size at all. The
output is resolution-independent – pick any bar_width (or
cellsize), and let the consuming layout tool scale to the X-dimension
you need:
SVG: set
widthandheightin HTML / CSS, or via theviewBoxin your design tool.EPS: scale at inclusion time –
\includegraphics[width=40mm]{...}in LaTeX, or via the placement size in Illustrator / InDesign.
The EPS bar_width is in PostScript points (1 pt = 1/72 inch ≈
0.353 mm), so the default already produces a physically sensible size if
you don’t override it at inclusion time.
Tip
For PDF output, embed the SVG in an HTML template and render with WeasyPrint. This is a clean route to multi-up label sheets, packing slips and similar print-ready documents.
Raster output (PNG)
PNG is the only output format where bar_width / cellsize fixes
the print size, because raster images don’t scale losslessly. Working
back from a target X-dimension and printer DPI:
bar_width (px) = X-dimension (mm) * DPI / 25.4
At 300 DPI, an X-dimension of 0.25 mm requires bar_width=3 (rounded
up from 2.95). At 600 DPI, the same X-dimension requires bar_width=6.
Round up to the nearest integer pixel; rounding down pushes the X-dimension below the readable limit.
Quiet zones
Every symbology requires white space (the quiet zone) around the symbol so scanners can locate its boundaries. pyStrich emits a quiet zone automatically; do not crop into the white margin when compositing the output into another image.
Symbology |
Quiet zone applied by pyStrich |
|---|---|
Code 39 |
10x |
Code 128 |
10x |
EAN-13 |
11x |
Data Matrix |
Configurable via |
QR Code |
4 modules on each side (mandated by spec). |
PDF417 |
Configurable via |
Aztec Code |
Configurable via |
Damage tolerance
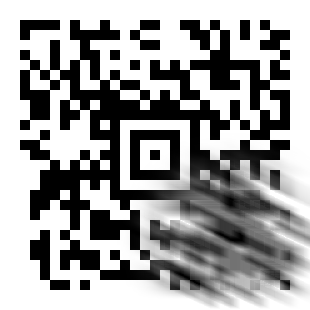
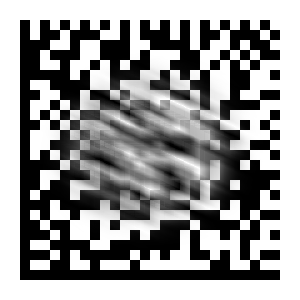
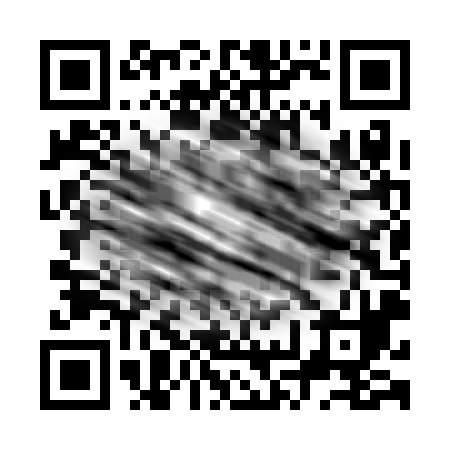
2D barcodes offer some tolerance to physical and environmental damage – scuffing, smudging, marking, partial occlusion – thanks to their Reed-Solomon error correction. This tolerance can be improved by increasing the error correction level, increasing print dimensions, and positioning the barcode away from the edges of the label or document (which take the most wear). Using suitable media and printing is essential.
For harsh environments, if the encoded data has a predictable length and character set, raise the error correction level as high as the available label or document space permits at a sensible module size.
Error correction protects only the data area: the symbol’s fixed patterns (finder, locator or bullseye) must remain identifiable for the decoder to lock on at all.
The examples below each survive a dramatic diagonal smudge placed clear of those fixed patterns.
Aztec ( |
Data Matrix |
QR Code ( |
|---|---|---|
|
|
|
Verification
If a printed barcode does not scan reliably:
Try to scan it on screen first. If it fails on screen, the encoding or sizing is wrong; if it succeeds on screen but fails in print, the print process is the issue.
Measure the X-dimension with a ruler or loupe and verify the quiet zone is intact – not cropped, not printed against a coloured background.
Check print contrast – low-DPI thermal printers or worn ribbons can produce bars that are too grey to be read.
For production deployments printing barcodes at scale, consider using a print-quality verifier (an instrument that scores symbols against ISO/IEC 15415 / 15416). A passing grade once during integration is worth more than re-printing a thousand failed labels.